|
Class Dojo is a free educational tool that allows for parent communication and positive reinforcement for the primary grades. You can use Dojo on your phone or tablet as an app or on your PC or Chromebook through the website. This program connects parents through the app using an email or phone number. Then, you can message them through an instant messenger. It is a lot like texting, but you do not have to give out your personal phone number. You can send messages to parents individually or easily send it to the whole class. You can also set quiet hours on the app. This allows the app to send out an automated message response to messages that you receive during your those times. There is also a class story for communicating with parents. This works similar to a Facebook page. You can post important reminders, statuses, or pictures on the class story for all to see. You can also connect with other class stories. For example, my school has a general class story for the whole school. The guidance counselor and principals can easily post information on this story to share with parents in every grade level and the information goes straight to parents' phones. Class Dojo allows you to track points for positive reinforcement. You can create categories for any behavior you want and then assign those behaviors a point value. You can give desirable behaviors positive point values and undesirable behaviors negative values. Then, you just have to click the category and the program will keep track of the point values for you. You can use the points system to reward students individually or as a class. You could allow students to use points as a currency for a classroom store or use it as a goal to reach for a set reward. You can share the points scoreboard with the class or keep it private. This type of system adds competition and excitement to the classroom and the kids love it! The program also has a handful of useful classroom tools. It includes a timer, random student picker, group maker, directions presenter, and so much more! I mainly use this app for communicating with parents, but it is an overall great tool, especially for the great price of FREE. Click here to check out Class Dojo and make a free account.  (2020). Retrieved 9 December 2020, from https://i.pinimg.com/originals/50/d2/0d/50d20d3f1ea6d353261891e0feeea027
0 Comments
Canva is one of my absolute favorite tech tools, both for school and personal use. It is so easy to create beautiful designs. If you have never heard of or used Canva before, check out my original explanation of the application here. What's new? Recently, Canva added a "trending education templates" section! This makes creating materials for teaching even easier. This section includes templates for virtual classrooms, presentations, worksheets, lesson plans, calendars, infographics, posters, flash cards, classroom banners, Google Classroom headers and more! There is also a category called Classroom Kits. These kits include bundles of each of the aforementioned resources with a cohesive theme. Plus, all of the templates are easily editable, so you can customize them to your liking! Below are a few examples that I have made this week. Google Classroom Header This was a premade template. I just edited the text size. Reading/ELA Overview The background for this page was a template. I added the heading with a preset text pairing and resized it. Then, I added the other information in textboxes. Google Meet Etiquette Poster This is another template that I simply changed the text on.
Smore is a free online resource that allows users to create electronic newsletters. It is simple to use and creates professional products. I love that you can embed links, pictures, videos, audio, and more within the newsletter, so that readers can quickly access those resources with ease.
This tool is great for teachers and students alike. Teachers can collect resources for unit plans all in one place for easy access. Additionally, it is a great way to share students artifacts with parents. Teachers can easily upload classroom updates, samples of student work, photos, and videos for easy communication with families. Students can use this resource to creatively display information for projects. The free trial allows you to create three free smore presentations. Then, you can upgrade to the basic plan for a monthly rate. The example below contains book study resources for Monday's Not Coming. This book is great for discussing poverty, abuse, addiction, trauma and other real life struggle.
Example
If you are a teacher who is looking for ways to engage your students, communicate with parents, decorate your classroom, incorporate technology into lessons, or just about anything really, check out Pinterest. Pinterest is a social media tool that helps users find and save creative ideas. All you have to do to get started is set up a free account by going to Pinterest. After setting up an account you can search for specific or general topics to find ideas you are interested in. If you find a topic that you really like you can Pin or Save that idea to a Board. A Board is a place to categorize all of the pins you save, so you can find them easier. *** DISCLAIMER: Pinterest is highly addictive.
For teachers, this tool can be incredibly powerful. Like I said above, you can truly find ideas about anything on Pinterest. You can find different ways to deliver content, ways to change up assessment, how to best manage your students and so much more. I cannot do justice to this application. To truly understand how great it is, you have to check it out for yourself. I use Pinterest for all sorts of things. I often look up different ways to engage students during "boring" lessons. Most recently, I did this for a science lesson that included many definitions. Pinterest offered ideas for different styles of notes, student participation, and tech tools to help with engagement. These ideas dictate the types of boards I create. For example, I have a tech tools board that includes all of the technology that I think could be useful in the classroom. Many of the examples can relate to the SAMR Model and help educators incorporate tech meaningfully. I also have boards for specific subjects, such as science. I love to save ideas for experiments and demonstrations that I may be able to use in the future. Pinterest members offer great alternatives to make boring content fun and exciting. My favorite board though is my Growth Mindset Board. It is a reminder to myself and to my students that hard work is essential for personal growth and that we are capable of great and challenging things. Pinterest can truly help teachers grow in all areas of the Danielson Framework, but I think Pinterest is most related to Domain 4E, Growing and Developing Professionally. Pinterest is a constant feed of sources to help us grow as educators in all areas. It offers great ideas for planning and prep, classroom environment, instruction and professional responsibilities. It can give you ideas for new content and pedagogy, the best ways to organize your classroom, how to improve student participation, and how to best keep records and that's just breaking the surface of all the amazing thing Pinterest can provide you. As teachers grow in each area of Danielson's Framework, they are growing and developing as professionals. I love Pinterest now and forever. I do not think I will ever get tired of it or change anything about it. I love that you are able to find great ideas, but also share your great ideas! Pinterest is an amazing addition to any teacher's PLN. I already know that I will continue using Pinterest throughout my career, especially to find engaging activities for all students. I encourage you all to check out Pinterest today; it will change the way you teach. Below is an example of one of my Pinterest Boards. Check out my other boards for more ideas. Interactive White Boards and Participation If you are looking for a way to get students more actively engaged in lessons, an interactive white board may be exactly what you need! Most often, when teachers present notes, they have a PowerPoint from which students mindlessly copy. In this typical scenario, students are neither engaged nor participating. To keep students from being passive receivers of information, teachers have to get students involved, so they are actively learning. Gynzy Interactive white board applications can make this process easy and effective. I recommend checking out Gynzy. This tool is especially useful because it offers all of the pros of an interactive white board, without actually requiring an interactive white board. This is great for those of you who do not have an interactive white board or those who prefer that students do not leave their seats during a lesson. You can have students access the presentation on a computer or tablet and interact from their seats. To get started, go to Gynzy and create a free account. Once you are logged in, go to the tabs on the left hand side and click Board. This is where you can start creating your presentation. You can add slides by clicking on the "+" button in the bottom right hand corner. On each slide you can add text, images, math tools, videos and more. The most useful part of the application is accessed under the Tools tab. Here you can search for tools for specific subjects and grade levels and personalize them. Each topic has lessons and activities prepared on popular topics. There is also an Extra tab that contains tools like timers, video and image search, review games and more. In my specific example about the Bohr Model, I found it useful to create my text slides on Canva and upload them as images. I inserted an informational video using the YouTube tool under the Extra tab. Adding a short video to a lesson can help keep students engaged. It catches their attention as it changes the structure of the lesson. After reviewing the schema and learning the new knowledge needed for the lesson, I added an activity that can be used as guided or independent practice to promote student participation. In this activity, the students apply their new knowledge by drawing Bohr models. To draw in the model, they simply open the Pen tool and draw in the electrons. I ended the lesson with a quick review quiz that gives instant feedback to fix any incorrect schema. To add a quiz, go to the Extras tab and insert a quiz- you can customize the quiz to fit your needs. When you are finished with your lesson, be sure to save it! One of the only cons of this tool is that it does not automatically save. Support for Interactive Presentations Danielson domain 3 (Instruction) supports the use of interactive presentations. This presentation includes the use of questions (3b) and assessment in instruction (3d). Most importantly, it engages students in learning as it requires their attention and participation (3c). The ISTE standards support these presentations because the teacher facilitates and inspires student learning and creativity, designs and develops digital age learning experiences and assessments, and models digital age work and learning. Similarly, students act as empowered learners, digital citizens, and knowledge constructors. The SAMR Model supports this style of teaching as it modifies the learning experience. By including assessment with instant feedback, teachers can ensure they are meeting the needs of their students. Additionally, it gives information to students about what they need to study further. Interactive presentations allow for student participation in teacher-centered lessons. This allows educators to quickly get through large amounts of information, while still allowing students to actively participate and learn. See my example below in the slide show or click here to open the interactive presentation. References
Danielson, C. (2011). The Danielson Group. The Framework for Teacher Evaluation Instrument. Retrieved from: http://static.pdesas.org/content/documents/danielson_rubric_32.pdf Gynzy (2017). Gynzy.com. Retrieved 24 November 2017, from https://api.gynzy.com/en/#!/welcome/items_home ISTE | Standards For Students. (2017). Iste.org. Retrieved 24 November 2017, from https://www.iste.org/standards/for-students ISTE | Standards For Teachers. (2017). Iste.org. Retrieved 24 November 2017, from https://www.iste.org/docs/pdfs/20-14_ISTE_Standards-T_PDF.pdf Walsh, K. (2015). 8 Examples of Transforming Lessons Through the SAMR Cycle | Emerging Education Technologies. Emergingedtech.com. Retrieved 24 November 2017, from http://www.emergingedtech.com/2015/04/examples-of-transforming-lessons-through-samr/
Virtual Reality
Virtual reality (VR) is an immersive computer-generated experience. Computers can generate environments to simulate the feeling of real life and we can be part of these environments. This allows us to experience things that otherwise may be impossible. Whether you want to sing on stage with Ed Sheeran or Kanye, travel through the digestive system, or visit Mars, VR can make it possible. This makes VR incredibly powerful within the classroom. As teachers, we can help our students experience new and "impossible" things. We can be part of the stories we explore in Reading as we enter the "physical" setting. We can experience Science first-hand as we enter the human body. We can even take them to visit the ancient and mysterious places we discuss in Social Studies. You may ask, "How can we do these things? It seems hard." However, it is far easier than you would expect. Many of the experiences I discussed already exist and are available for free. Applications like Google Expeditions, Discovery VR, YouTube360, Nearpod, and many others offer easy to use VR experiences. These types of experiences are useful on any device as they offer deep exploration. However, things change completely whenever we access them on a smart phone and utilize a VR headset. Headsets allow for the full immersion experience to occur. Virtual reality headwear makes the wearer feel as if they are truly in the environment. As they move, so does the image they are viewing. VR Application Many of the experiences I discussed in the previous paragraphs are available through Nearpod. To utilize these resources all you need to do is visit their site and create a free account. Once you are logged in you will be taken to a homepage, where you will have the options to Explore or Create. I would recommend checking out the Explore Tab first, there are many presentation options for all subjects and grades. If you can not find what you are looking for, navigate to the Create Page. Here, you can create personalized presentations that can include regular PowerPoint style slides, simulations, Web content, quizzes, surveys, and games. All of these tools help engage students in learning and can create a fun learning experience. However, my favorite part of Nearpod presentations is the ability to add Virtual Field trips. These are simulations of amazing places that many students will learn about or want to visit. They are easy to add. Just click Add Slide, Add Content, then Virtual Field Trip. You can search their extensive library to find almost any destination for free. This is incredible because you can let students explore many places they may never have the opportunity to visit. Virtual field trips are especially meaningful when working with students from lower income areas. These types of students may have never been given the opportunity to venture anywhere unlike their home. You can help them "travel" for a relatively low cost. You can buy a VR headset for around $10 and utilize free software to create a life changing experience. Example For the example I am going to share with you, I took the approach of a virtual field trip. I extended the QR Lesson I discussed in my last post about earthly land forms. In that lesson, we learned about types of landforms, including valleys, plateaus, hills, mountains, loess, and glaciers. To extend the lesson, we took a virtual trip to specific examples of these land forms from around the world using Nearpod. In addition to visiting these locations, we learned about facts from each one. We began by reviewing the types of land forms from the same resource we used the first time. I added this to the presentation using the add Web Content option. This is nice because it opens directly to the site, so students are not freely roaming the Internet. After choosing the specific locations we were going to visit, I researched each and put the information into a PowerPoint that I uploaded into the presentation. To finish the lesson, I included questions to gauge understanding and reflect on the lesson. Once the lesson was finished, I shared the link to the presentation with the students. This opened Nearpod directly and they just had to type in the code generated for the presentation. Nearpod helps to make lessons fun and engaging. However, if you are still worried about students doing other things on their devices, you can lock their screens to the presentation. You can check out my presentation here
Support for VR in the Classroom
Virtual reality use within the classroom is supported by the Danielson Framework. Specifically, VR engages students in learning (Component 3D) to help them develop a better understanding of the material. When the students understand the material better, they can answer questions higher within Bloom's Taxonomy (Component 3B). The ISTE Standards support VR as it creates students who are digital citizens, empowered learners, and innovative designers. Similarly, teachers can display their knowledge of the ISTE Standards for Teachers as they model digital age work and learning, as well as facilitate student learning and creativity. Virtual reality is a prime example of the Redefinition stage of the SAMR Model, as it allows students to experience learning in an entirely new and innovative way. Conclusion Virtual reality offers a sensory rich and memorable learning experience. You can allow students to explore new places and experience in an episodic manner. Just remember to supply your students with a "road map" so they know what to be looking for throughout the lesson. Then, "unpack" the lesson afterwards to help students reflect upon and review the content to which they were exposed. If possible, give them a "souvenir" to help them remember their experience.
References
Bale Mountain Lodge. (2017). Balemountainlodge.com. Retrieved 6 November 2017, from http://www.balemountainlodge.com/ Danielson, C. (2011). The Danielson Group. The Framework for Teacher Evaluation Instrument. Retrieved from: http://static.pdesas.org/content/documents/danielson_rubric_32.pdf Death Valley | region, California, United States. (2017). Encyclopedia Britannica. Retrieved 5 November 2017, from https://www.britannica.com/place/Death-Valley#toc1761 Hays, J. (2017). SHANXI PROVINCE (Datong, Yungang Grottoes, Pingyao) | Facts and Details. Factsanddetails.com. Retrieved 6 November 2017, from http://factsanddetails.com/china/cat15/sub10 ISTE | Standards For Students . (2017). Iste.org. Retrieved 11 November 2017, from https://www.iste.org/standards/for-students Mount Edith Cavell in Alberta | Expedia.co.uk. (2017). Expedia.com. Retrieved 6 November 2017, from https://www.expedia.com/Mount-Edith-Cavell-Alberta.d6072345.Vacation-Attraction Nearpod. (2017). App.nearpod.com. Retrieved 6 November 2017, from https://app.nearpod.com/library?or=3 Landforms: Face of the Earth. (2017). Edu.pe.ca. Retrieved 6 November 2017, from http://www.edu.pe.ca/southernkings/landforms.htm Lithuania | history - geography. (2017). Encyclopedia Britannica. Retrieved 6 November 2017, from https://www.britannica.com/place/Lithuania SAS Search Standards. Retrieved November 06, 2017, from https://www.pdesas.org/Standard/Search Svartisen – Norway’S Second Largest Glacier." Visithelgeland.com. N. p., 2013. Web. 6 Nov. 2017. Walsh, K. (2015). 8 Examples of Transforming Lessons Through the SAMR Cycle | Emerging Education Technologies. Emergingedtech.com. Retrieved 11 November 2017, from http://www.emergingedtech.com/2015/04/examples-of-transforming-lessons-through-samr/ What is virtual reality? - A simple introduction. (2017). Explain that Stuff. Retrieved 11 November 2017, from http://www.explainthatstuff.com/virtualreality
Augmented Reality
Augmented reality combines real life with the power of technology. It allows technology users to bring artifacts from the world of technology into the real world. Augmented reality enhances our true reality as it "superimposes computer generated images" over what the viewer sees. QR Codes One example of commonly used augmented reality (AR) is QR Codes. QR codes can be used to simplify navigation to virtual content. Often, they will be placed on advertisements or products to lead consumers to company websites, directions, or other information. QR Codes can also be used within the school environment. By having students scan QR codes to open academic content, teachers can save time. QR Codes eliminate wasted time, as the scanner instantly opens the correct location. QR Code Activity For my specific example, I created an activity pertaining to earthly land forms. This activity is easiest to use when the posters are printed. For students to engage in this activity, they must have some sort of device that has a QR Code reader. If their device does not already have a QR reader app, there are plenty of free ones for both Apple and Android devices. After downloading a reader, the procedure is simple. They open the QR scanner app and scan the QR Code. When the code is scanned, the content will instantly open. In this case, the codes open a webpage containing information about common land forms. After ensuring that the students can navigate to the correct content, the directions are simple. Read the article and answer the questions that relate to the specific land form in the article. After they do this for each of the land forms in the activity, they can check their answers in a similar fashion. The final poster in this activity contains another set of QR Codes that open to the answers to the questions on each poster. Again, explain to the students that they must simply scan their codes and the content will automatically open, so they can check their work. Making QR Codes Making QR codes is easy. There are many free websites and apps that require little time and effort to produce the codes. A few I recommend checking out are: qrstuff.com, classtools.net, Vocaroo.com and websiteplanet.com. I highly recommend websiteplanet.com. It is extremely user friendly and offers lots of options for customization. You can change the color, add a logo and even add a frame for free! These QR Codes will add great visual appeal to your digital tools, while making materials easy to access. For the QR Codes I used in my activity, I used qrstuff.com. All I had to do was find content I liked online and copy/paste the URL into the code maker on the website. The website will generate two codes, a static and dynamic image. Both of these images will take you to the same location, but whichever one has more "dark" space will scan easier. After you choose a code, download it to your computer. Embedding QR Codes After I had all of my codes to the informative articles generated, I began making the posters you see below. I made these using Canva. You can create the posters to look and contain anything you want. Then when you are ready to insert your QR Code, just go to "Upload" and upload the QR Codes you downloaded earlier. Then you can place them wherever you desire. Then all you have to do is print the finished product. Types of Augmented Reality This activity utilizes QR Codes for superimposed augmented reality. In this case, the QR Code is the superimposed image discussed above. When the image registers in the scanner it opens entirely new visual content. However, this is not the only type of augmented reality. You can check out other types of augmented reality and their applications here. Danielson Connection There is plenty of support as to why you should use QR Codes in your classroom. We can look to Charlotte Danielson's framework for validation. QR Codes apply to Domain 2C Managing Classroom Procedures. In my example, the use of AR minimizes the necessary supplies and material. It also fits into Domain 3C Engaging students in learning. Using QR Codes and AR allows teachers to gather material and content from various places with ease, while not having to print or buy multiple resources. This helps keep students engaged, as they are not restricted to only a textbook. ISTE Support The use of QR Codes and AR within the classroom displays a teacher's knowledge of the ISTE Standards for Teachers. The teacher is designing and developing digital age learning experiences and assessments, while they promote and model digital citizenship and responsibility. They are also showing knowledge of the ISTE Standards for Students, as they encourage their students to be digital citizens. Connection to The SAMR Model Augmented reality utilizes the SAMR model. In my example, QR Codes simply enhance the lesson through the low levels of SAMR. However, augmented reality can transform a lesson through the modification and redefinition stages of SAMR. Other Classroom Uses for AR and QR Codes In addition to my example featured in this post, there are many other uses for AR and QR Codes. AR can help students develop a deeper understanding of material and experience it in a brand new way. I recommend checking out these AR apps: Anatomy 4D, Elements 4D, Chromville, and Quiver Vision. These apps help make learning fun and exciting. QR Codes can be used for classroom management. They can be used to take attendance, sign students in and out of class, borrow classroom materials, make a calendar more inclusive, and even help inform parents.
References
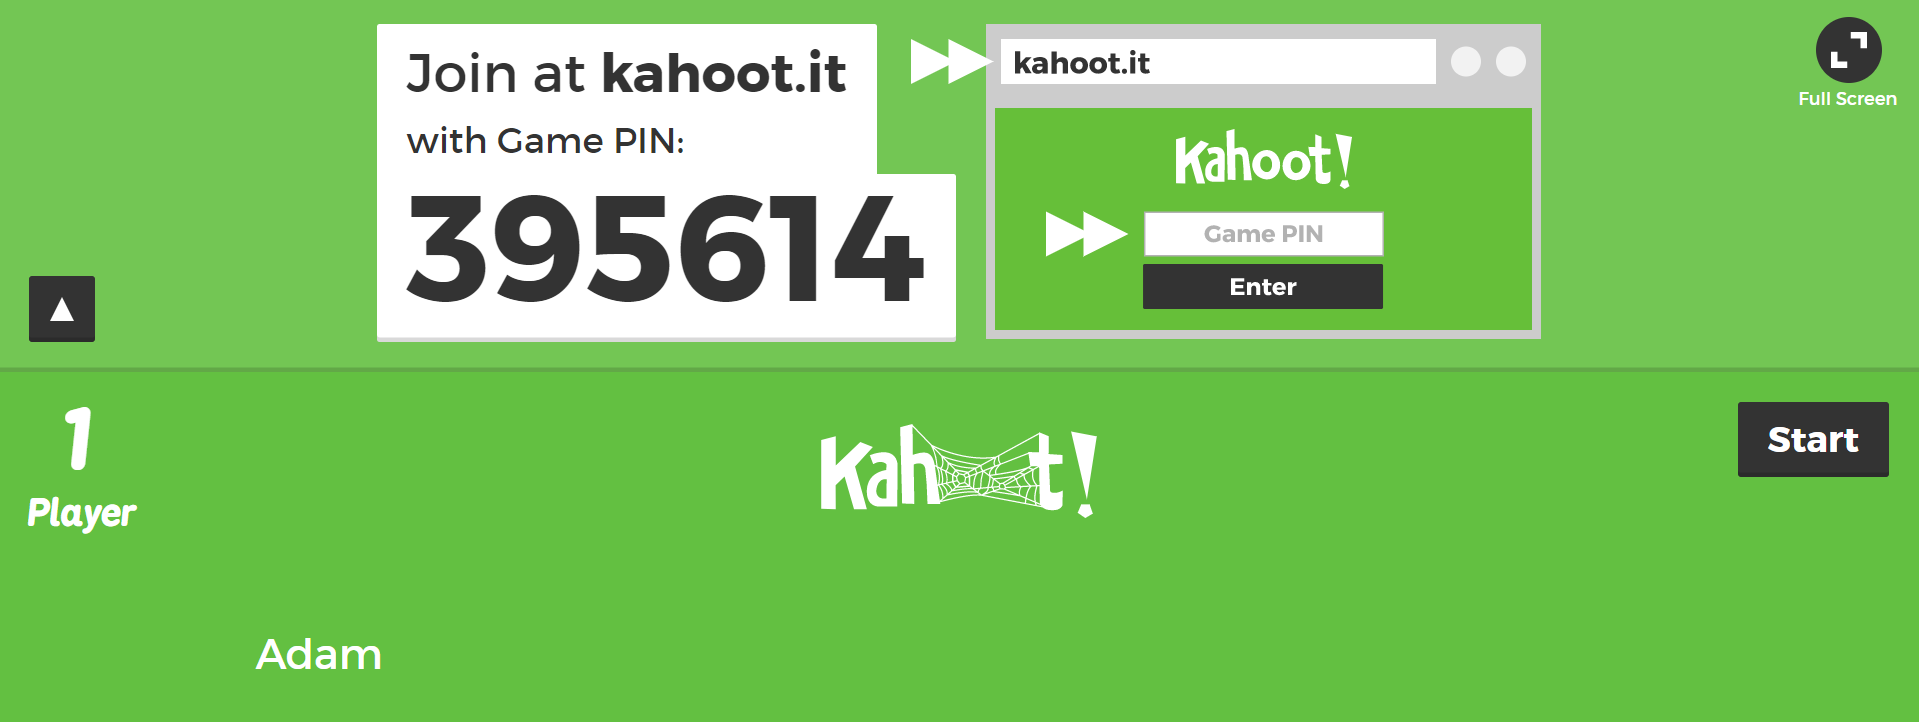
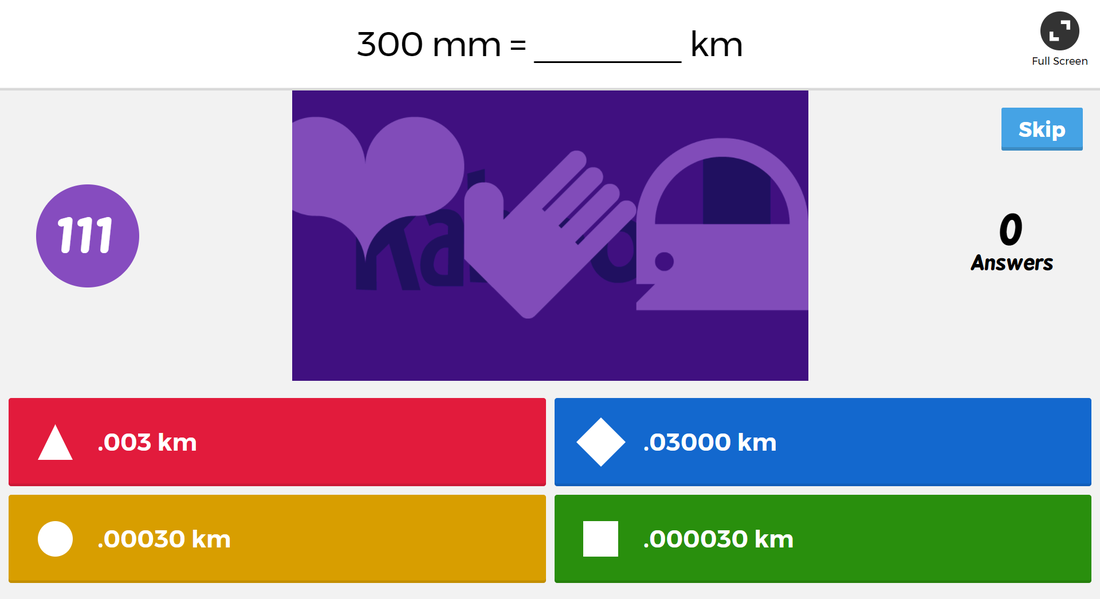
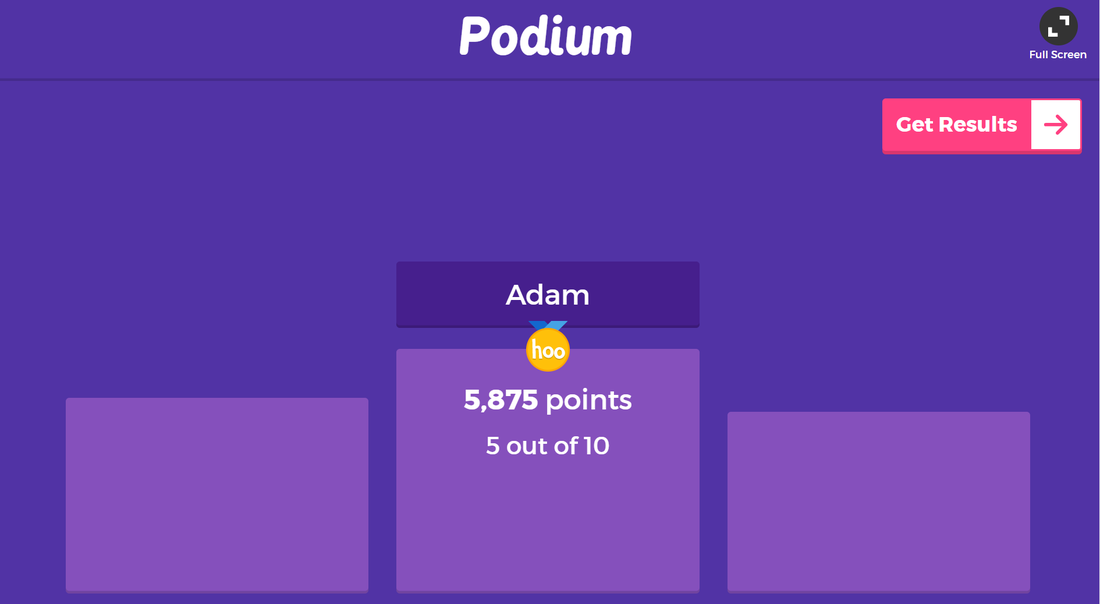
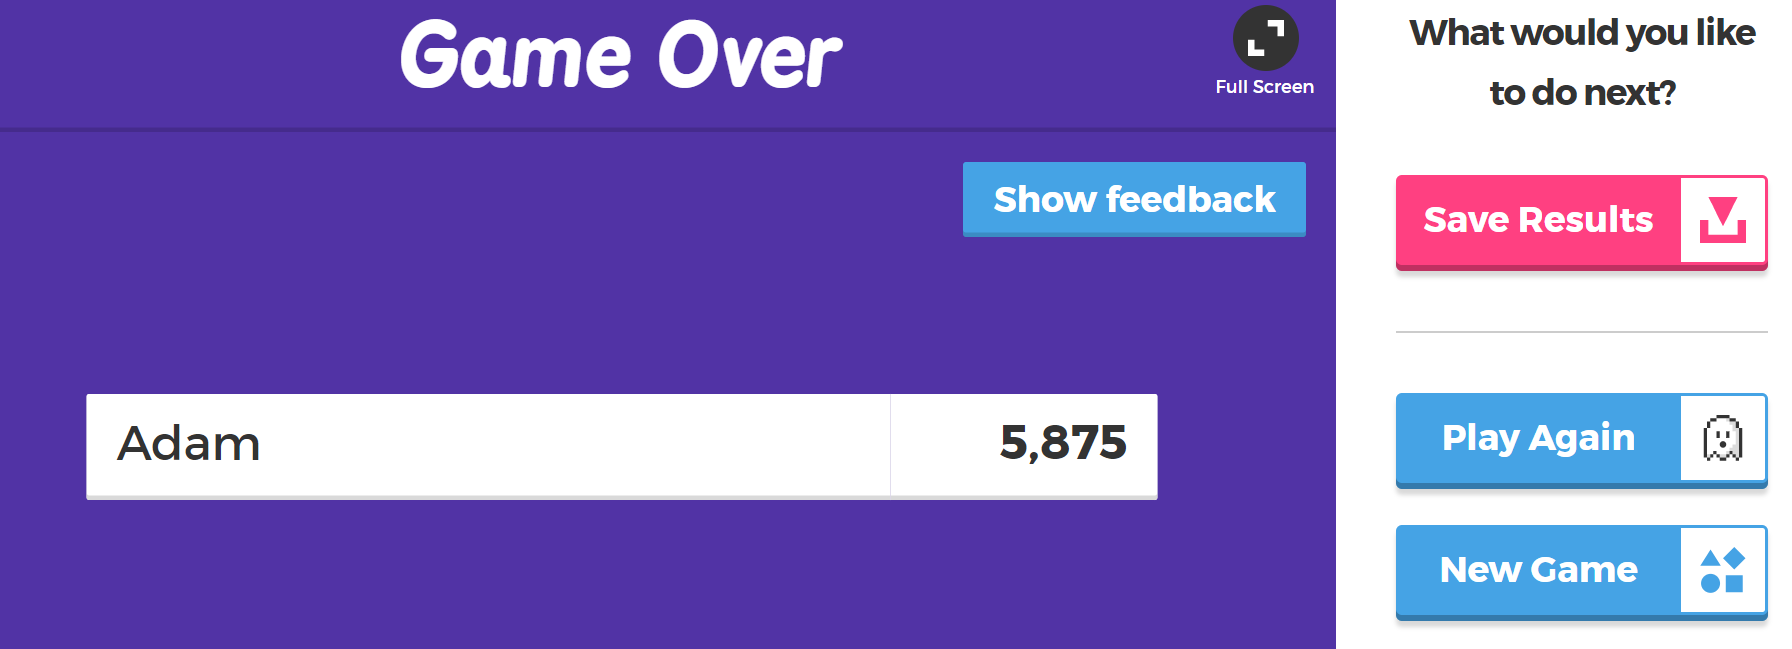
Anon (2017). Iste.org. Retrieved 5 November 2017, from https://www.iste.org/docs/pdfs/20- 14_ISTE_Standards-T_PDF.pdf Danielson, C. (2011). The Danielson Group. The Framework for Teacher Evaluation Instrument. Retrieved from: http://static.pdesas.org/content/documents/danielson_rubric_32.pdf ISTE | Standards For Students . (2017). Iste.org. Retrieved 5 November 2017, from https://www.iste.org/standards/for-students Technology, W., Reality, M., Reality, A., Reality, V., Aviation, & Business et al. (2017). The Ultimate Augmented Reality Technology Guide. Reality Technologies. Retrieved 5 November 2017, from http://www.realitytechnologies.com/augmented-reality Walsh, K. (2015). 8 Examples of Transforming Lessons Through the SAMR Cycle | Emerging Education Technologies. Emergingedtech.com. Retrieved 5 November 2017, from http://www.emergingedtech.com/2015/04/examples-of-transforming-lessons-through- samr/  Kahoot is a fun assessment that is loved by students of all ages. It's fun, it's easy, and it's FREE! So, let's find out how to get started. Go to https://create.kahoot.it. Then sign up for an account. Once you are logged in, go to the heading Create a New Kahoot and choose Quiz. Next, you have to give your quiz a title and description. You can make your quiz public so other people can use it. In this case you want to make the title name generic and include hashtags in your description, so others can find it. Then click Got It! to move on and add questions. A new screen will pop-up and you simply have to click the Add Question button. You can add your question, specify the amount of time students have to answer it, and include 4 answer choices. After you have done this and added all your questions, it's time to play! To play, your students have to have some type of device to answer with and you must have a screen to display the questions and answers on. The student device is used only for answering the question, they can not view the question content. Each quiz is designated a specific Game PIN and students will use it to join the game. During the game, the main screen will display the questions like the third image below. After the game is played, you can display the winners on the leader board, review all student scores, and download a detailed report of the answers.
This specific Kahoot is for 7th grade science and contains 25 examples of metric conversions. The game can be found at this link: https://play.kahoot.it/#/k/2b8d011f-f10c-48f8-b24c-bb256a07241a Kahoot fits into Danielson Domain 3 (Instruction). Kahoot lets you engage students in a nontraditional style of assessment. It provides instant feedback for students and promotes healthy competition. Competition acts as extrinsic motivation to drive students. As a review game, Kahoot helps students reflect on what they have learned to help them prepare for an exam. Kahoot also incorporates tech into pedagogy to help develop students into empowered learners. Most of all though, Kahoot makes learning fun! References
Play Kahoot. (2017). Nationalgeographic.org. Retrieved 21 October 2017, from https://www.nationalgeographic.org/bee/study/play-kahoot/
In general, I would recommend using Google drive. It is free and easy to use. In this specific post, we are going to be taking a closer look at Google Forms. This application makes taking surveys, quizzes, and recording general data easy.
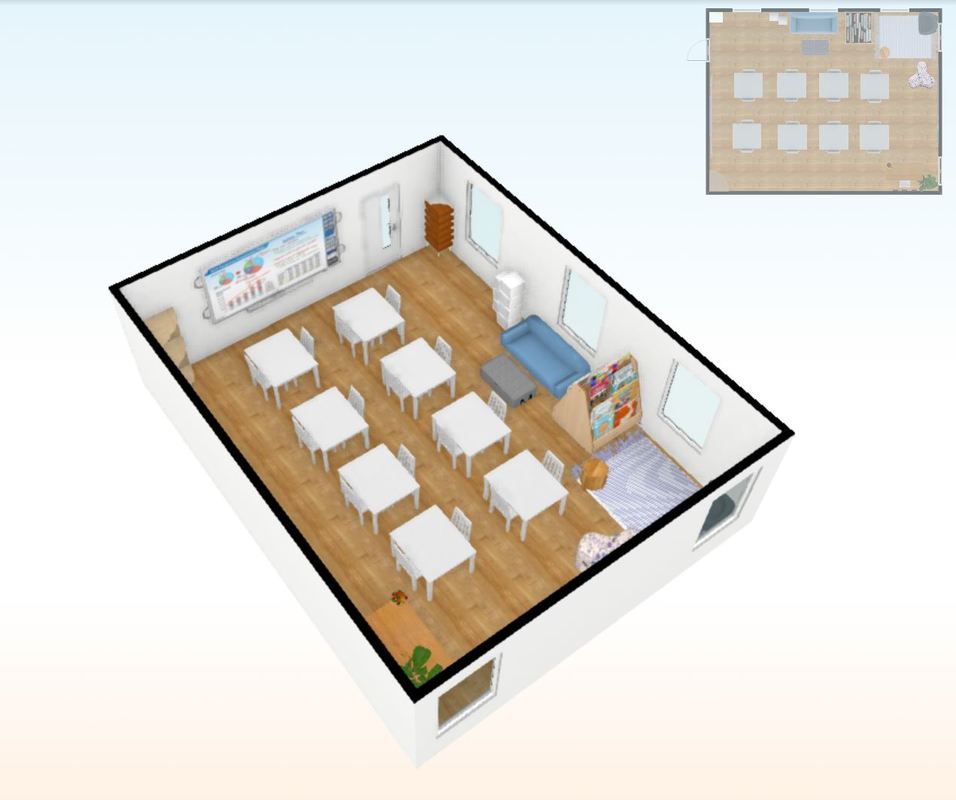
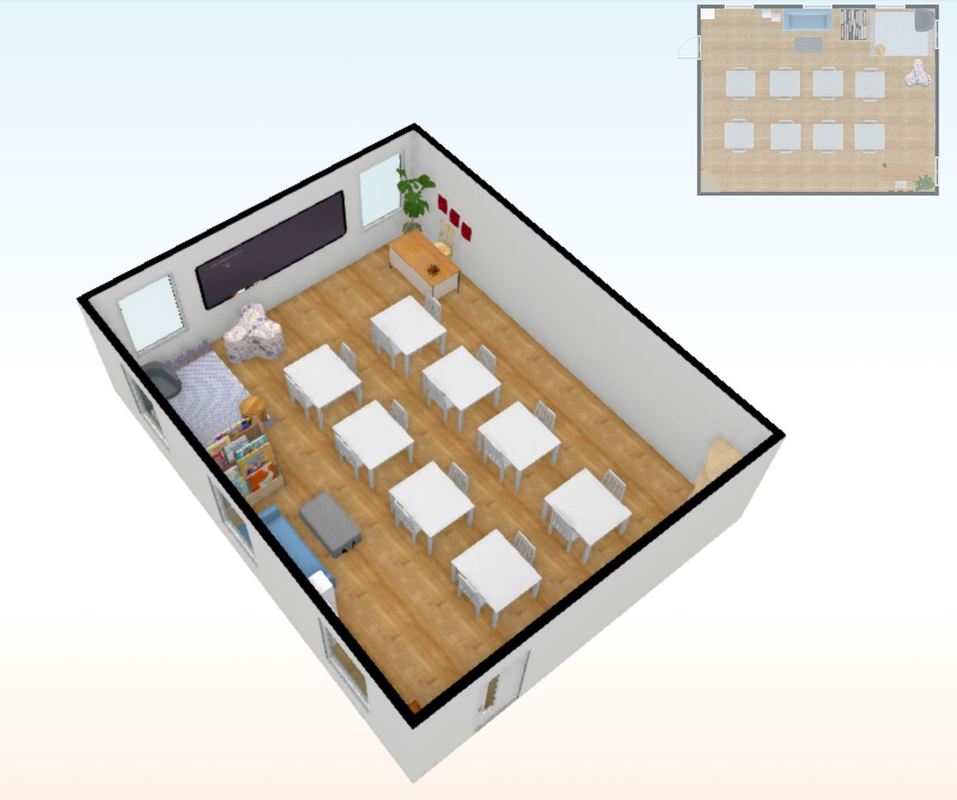
Start by creating a FREE account on google. Once you are logged into your account, make your way to Google Drive. Click New, then More, and then Google Form. Once the new form has opened, title the document so it is easy to locate later. Then give a short description in the designated area, this is where I like to put directions. Then, you simply add you questions! By clicking the three dots in the bottom right corner, you can choose from a variety of question types or make a question required. To add another question just click the "+" button. Then it's time for my favorite part - choosing a form theme! This is what can make your form fun and personal. Just go to the top of the page and locate the paint palette icon and click. Here, you have options of tons of different themes, as well as the option to upload your own image. So, get create and have fun! This tool can fit into all of the Danielson Domains. For Domain 1, you can create student assessment. By creating an assessment in Google forms, you can provide your students with instant feedback. I think this could be great for a study guide; students can see what they missed and instantly see the correct answers. This minimizes the amount of time they have to construct false schema. For Domain 2, you can use Google Forms to help manage classroom procedures. One of my co-ops introduced me to the idea of Missing Assignment Sheets. When a student neglects to turn in an assignment, she makes them turn in one of these sheets. This way, she has documentation that states that the student did not turn in the assignment and knows the consequences. I really liked this idea because students cannot claim they turned in an assignment and you lost it, or one of a million other creative excuses they may come up with. Google Forms could make this process even easier. All of the information would be stored in one location and would easy to review. For Domain 3, Forms would simplify the process of communication with students. After a lesson, students could file out a form as an exit ticket. Using a different forum for formative assessment can be fun for students. Adding something new or a piece of technology can really help engage and excite them. You can also translate the responses of the form into a spreadsheet document to quickly gauge student understanding. I think Forms is most valuable in Domain 4. Google Forms can make communicating with families very easy. This can be a great way to collect student and parent data. You just have to put all the required information in the form and the parent fills it out and submits it without having to worry about the student as a middle man. This means less lost papers and faster responses! It can also be awesome when you need volunteers. Family members can go on the form and see what exactly you need. If they are interested in helping they simply have to fill out the form. I have provided an example below. Every educator knows the importance of getting to know their students beyond the classroom and Forms can be a great tool to do just that. It can be a fun substitution for the typical "All About Me" paper students seem to do at the beginning of each year. I created a student interest survey to help me better understand the personalities of my students. This can help me more effectively design and deliver my content. This also helps students towards becoming successful digital citizens and creative communicators. Overview Floorplanner is an online application to digitally design real space. You can set the dimensions of the space and customize all of the furniture to replicate your space. This makes organizing your classroom a breeze. You can drag the elements around to rearrange and add in new pieces to see how to optimize your classroom. It is especially nice because you can view the design in 3D; this gives you a good representation of how things will work out before you actually start moving stuff. The only down-side to this app is that you only get one free design, afterwards you have to pay to upgrade. My Design
 I designed my ideal space using Floorplanner. I used tables, rather than desks, to promote collaboration and communication. Placing students in pairs also helps teach them self-discipline, they have to sit quietly during the lesson while in close proximity to their friends. I also included a section of flexible seating where students can do work outside of instructional time. This allows students to be comfortable and relax a little while still getting their independent work done. I placed my desk area in the back corner of the room to provide a full view of the classroom. This way, I can easily see all of my students at the same time, regardless of where they are sitting, as well as anyone at the door. I added a smart-board at one end of the classroom to utilize during lessons, as well as a chalkboard at the other end. I liked the look of the chalkboard and the nostalgic feel it offered; it will also be useful when the technology of the smart-board inevitably fails. Having the boards and desks placed as they are ensure that everyone can see the material for the lesson and be involved in participation. I chose wooden floors because they look inviting, yet are still easy to clean. The storage is placed in the corners of the classroom to leave usable space in the middle and keep people from tripping on them. I also found pieces of furniture that could multitask in their purpose. Many of the seats also function as storage places. Floorplanner and Danielson Framework Floorplanner aids teachers in Danielson component 2E (Organization of Physical Space). It is easy to alter physical designs on the app to ensure there are clear walkways and space for students to move safely (Safety and Accessibility). It can also help you arrange furniture to maximize the potential of your classroom. This can make your classroom look bigger and run smoother (Arrangement of Furniture). You can also think about how you can arrange your resources to serve multiple purposes (Use of Physical Resources). Conclusion
I highly recommend this tool to everyone, not just teachers. It makes organizing physical space easy and fun. I will definitely continue to use this tool in my classroom to make sure I am optimizing my space effectively. Personally, I wish I could change the amount of designs you get for free, but you can always keep altering the one design you started with to get around that. Overall, the tool is great at helping educators become effective designers and facilitators (ISTE for Educators). |